How to Implement CAPTCHA or Recaptcha on MS Power Pages
I have been looking everywhere to be able to implement a CAPTCHA capability within MS Power Pages and I could not find an approach that worked well. As you were aware, Power Pages was very client-side heavy, and almost impossible to perform server-side interaction. Without the server-side validation, CAPTCHA would not work. I saw an article detailing how to load Google Recaptcha on Power Pages without the server validation. That would not work because without validating the user input with the secret key, the validation would not be whole.
So, after researching for some time, I was finally able to come up with a solution that worked quiet well. The only way we could do server-side interaction in Power Pages was through the use of REST API. So this was what we would do, creating a Table within Dataverse and also a Custom API for our Power Pages site to interact with it and perform the server validation for the CAPTCHA. We would be using Google Recaptcha for this.
Let me first lay out the steps as follows and I’ll follow each up with detailed explanation afterward:
- Obtain Google Recaptcha site key and secret key.
- Use Marius Wodtke’s PowerPagesActions solution.
- Create 2 Dataverse tables called “Portal Private Setting” and “Portal Public Setting”.
- Create a Plugin to do the Captcha server-side validation.
- Create a Custom API in Plugin Registration Tool.
- Add Table Permission and Site Settings.
- Register your Custom API with PowerPagesActions.
- Use JQuery HTTP call to the PowerPagesActions entity to perform the server validation.
1. Obtain Google Recaptcha site key and secret key
Go to https://www.google.com/recaptcha/admin/create and obtain your site key and secret key. This will be used to load and validate Recaptcha on your Power Pages site.
2. Use Marius Wodtke’s PowerPagesActions solution
I had to give credit to Marius. Such a genius to come up with this functionality. Head over to https://github.com/Kunter-Bunt/PowerPagesActions and download the solution (ZIP). I would simply upload the Managed one to my environment.
What this solution would do is to enable Power Pages to call Dataverse’s Custom API. Without this solution, it would be a complex and time consuming exercise to make it work as there was no direct connection between Power Pages and Dataverse especially around authentication.
Once you upload the solution, it would introduce a new menu within Power Pages Management (for portal with Enhanced data). If your site is still using the Standard data, it will use Portal Management instead. In this instance, you will need to edit the Portal Management app and add the menu manually. The new menu is as follows:
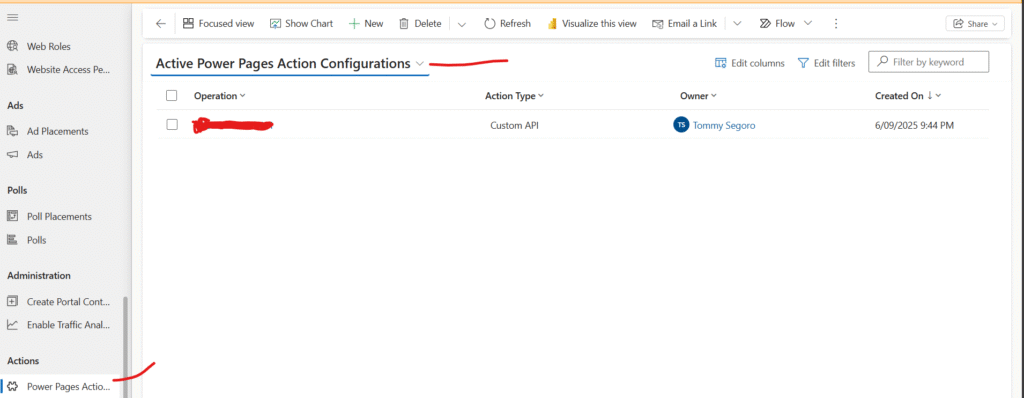
We will get back to this page once we’ve setup our Custom API.
3. Create 2 Dataverse tables called “Portal Private Setting” and “Portal Public Setting”
Next we need to create Dataverse tables to hold the Recaptcha site key and secret key. Why I had 2 tables was because the site key can be consumed by public while the secret key was only meant to be consumed by our code. As the site key has to be surfaced through the Power Pages portal, we will only expose the Public table to the public and not the Private one. If you keep both site key and secret key within the Public table, it means someone can go to your portal API endpoint and access the data within the public table e.g
https://myportal.powerappsportals.com/_api/tsa_publicsitesettings
The tables need to have the following fields:
- Name (text)
- Setting Value (text)
Once you’ve created the tables, add a record each:
- In Portal Public Setting
- Name: RecaptchaSiteKey
- Setting Value: your site key
- In Portal Private Setting
- Name: RecaptchaSecretKey
- Setting Value: your secret key
4. Create a Plugin to do the Captcha server-side validation
Create a new plugin for Dataverse to perform the Captcha server-side validation. Sample code is as follows.
The plugin takes “CaptchaInput” input parameter. And also, I will not detail how to query your Private Setting table for the RecaptchaSecretKey record you created earlier. In the code where you see “secretKey.Value”, this is the part which you need to replace with your own variable containing the secret key.
    public class CaptchaPlugin : IPlugin
    {
        public async void Execute(IServiceProvider serviceProvider)
        {

                string input = (string)context.InputParameters["CaptchaInput"];

                    using (var client = new HttpClient())
                    {
                        HttpWebRequest request = (HttpWebRequest)WebRequest.Create(String.Format("https://www.google.com/recaptcha/api/siteverify?secret={0}&response={1}", secretKey.Value, input));

                        using (HttpWebResponse response = (HttpWebResponse)request.GetResponse())
                        {
                            using (Stream stream = response.GetResponseStream())
                            {
                                using (StreamReader reader = new StreamReader(stream))
                                {
                                    var responseBody = reader.ReadToEnd();

                                    Repositories.Entities.GoogleRecaptchaResponse captchaResponse = JsonConvert.DeserializeObject<Repositories.Entities.GoogleRecaptchaResponse>(responseBody);

                                    if(captchaResponse != null && captchaResponse.success)
                                    {


                                        context.OutputParameters["CaptchaResults"] = "success";

                                    }


                                }
                            }
                        }


                    }
.....
The GoogleRecaptchaResponse class can be as simple as having a single property:
    public class GoogleRecaptchaResponse
    {
        public bool success { get; set; }
    }
We will assign the string “success” to the CaptchaResults output parameter of our Custom API plugin. I’ll explain this next.
Once you’ve created the plugin, register your assembly in Plugin Registration Tool.
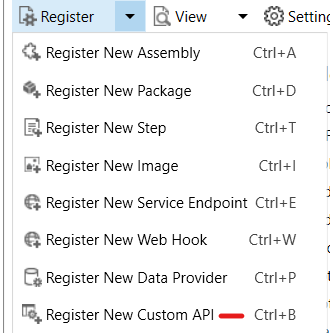
5. Create a Custom API in Plugin Registration Tool
Open Plugin Registration Tool and register a new Custom API.
And specify the following:
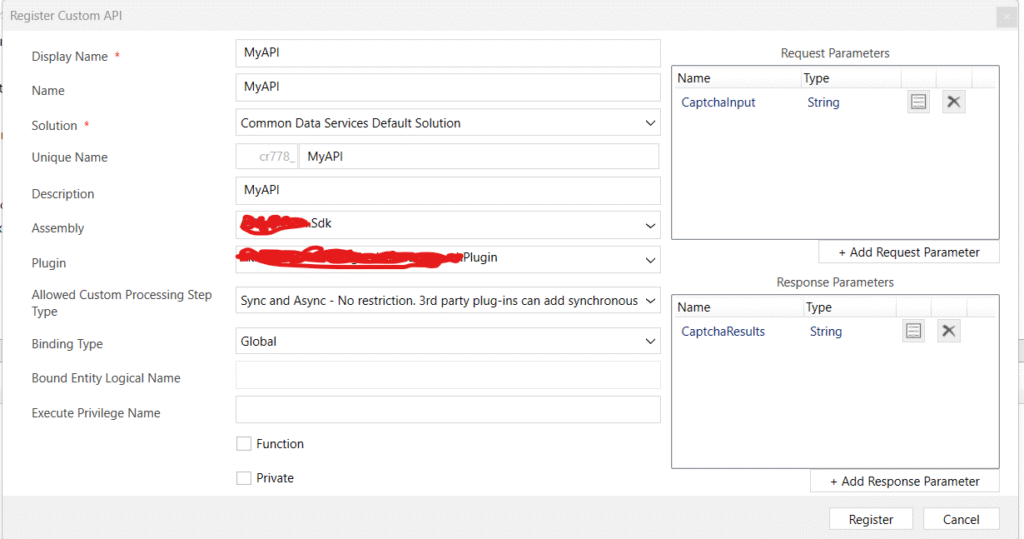
Specify the Display Name and Name of your Custom API, and also a custom solution. PRT will add your Custom API in your custom solution. Note the “Unique Name” which we will use next.
Specify your custom assembly and plugin we created earlier. Once you’ve registered your plugin with PRT, it will appear on the list.
Allow Sync and Async, and set binding type to Global.
Finally, create the Request and Response (input/output) parameter for our Custom API.
6. Add Table Permission and Site Settings
Go to your Power Pages Management (or Portal Management) and go to Table Permissions. Add a new record for Power Pages Actions:
- Name: Power Pages Actions
- Table Name: mwo_powerpagesaction
- Website: your portal
- Access Type: Global
- Privileges: Read
- And specify any Web Roles as necessary. If you would use Recaptcha on non-authenticated pages, then make sure you allow access for Anonymous Users
You would need to also add Table Permission for your public site setting table:
- Name: Portal Public Setting
- Table Name: tom_portalpublicsetting
- Website: your portal
- Access Type: Global
- Privileges: Read
- And specify any Web Roles as necessary. If you would use Recaptcha on non-authenticated pages, then make sure you allow access for Anonymous Users
Next, go to Site Settings and add the following records:
- Name: Webapi/mwo_powerpagesaction/enabled
- Value: true
- Name: Webapi/mwo_powerpagesaction/fields
- Value: *
- Name: Webapi/tom_publicportalsetting/enabled
- Value: true
- Name: Webapi/tom_publicportalsetting/fields
- Value: *
7. Register your Custom API with PowerPagesActions
Now, still in Power Pages Management (or Portal Management), create a new record in Power Pages Configuration with the following:
- Name: MyAPI
- Action Type: Custom API
- Custom API: *the internal name of your Custom API you noted earlier eg. cr778_MyAPI*
8. Use JQuery HTTP call to the PowerPagesActions entity to perform the server validation
Finally, go to your Power Pages page code and load and validate the Recaptcha.
First, we load Recaptcha script and specify “onLoadCallback” upon script load completion. Within onLoadCallback we perform a HTTP get to the Portal Public Setting table to obtain the Recaptcha site key. Once that’ successful, we load the Captcha on the page under recaptcha-container DIV.
We also specify “onCaptchaSuccess” callback when user is able to complete the Captcha successfully. This is the client-side validation. Within onCaptchaSuccess we call our server-side validation to complete the step through the use of PowerPagesAction Custom API we created earlier. Please note the name of the Custom API as well as the input variable.
 <div id="recaptcha-container"></div>

<script src="//www.google.com/recaptcha/api.js?onload=onloadCallback&render=explicit" async defer></script>

<script>

    function onloadCallback() {
      shell.getTokenDeferred().done(function (s) {
        $.ajax({
              url: "/_api/tom_portalpublicsettings?$filter=tom_name eq 'RecaptchaSiteKey'",
              type: 'GET', // Specifies the HTTP method as POST
              headers: {
                  'Content-Type': 'application/json',
                  '__RequestVerificationToken': s,
                  'Authorization': 'Bearer ' + s
              },
              success: function(response) {
                console.log(response);

                if(response != null && response.value != null && response.value.length > 0)
                {

                  grecaptcha.render('recaptcha-container', {
                      'sitekey': response.value[0].tom_settingvalue,
                      'callback': 'onCaptchaSuccess' // Optional: a function to call on successful verification
                  });

                }
              }
        });
      });


    }

    function onCaptchaSuccess(response) {


        shell.getTokenDeferred().done(function (s) {
            var actionInputs = JSON.stringify({
                "CaptchaInput" : captchaResponse
            });

            $.ajax({
            url: "/_api/mwo_powerpagesactions?$filter=mwo_operation eq 'MyAPI' and mwo_inputs eq '" + actionInputs + "'",
            type: 'GET', // Specifies the HTTP method as POST
            headers: {
                'Content-Type': 'application/json',
                '__RequestVerificationToken': s,
                'Authorization': 'Bearer ' + s
            },
            success: function(response) {

                if(response != null && response.value != null && response.value.length > 0)
                {
                  var responseValue = response.value[0];

                  if(responseValue.mwo_outputs != null && responseValue.mwo_outputs != "" && responseValue.mwo_outputs != "undefined")
                  {
                     if(responseValue.mwo_outputs == "success"){
                             // Captcha is success, perform further action.
                     }

                  }
                }

            },
            error: function(xhr, status, error) {

                console.error('Error:', error);
            }
            });

        });


        grecaptcha.reset();
    }
</script>
That’s it. Below is some examples of the action:
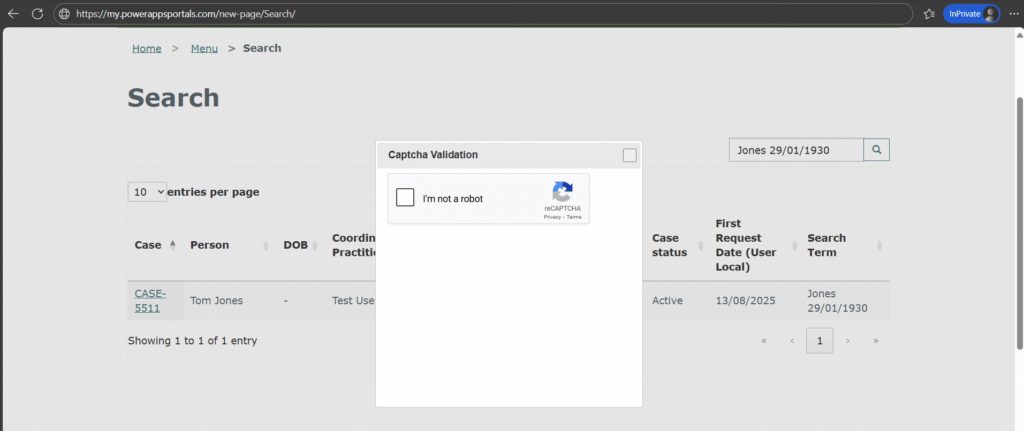
Hope this helps. Cheers.